To make the aluminum profile have a more perfect surface quality and better performance. We usually need perfect control of the metal liquid in the process of making aluminum profiles – let the metal liquid flow evenly in the model. Take five minutes to read this article, and you will know the method of aluminum extrusion to control the uniform flow rate of metal in each part.
1. By changing the geometry and size of the die hole working belt
For simple aluminum profiles with small external dimensions, good symmetry, and equal or approximately equal wall thicknesses of each part, the working belts of each part of the die hole can be of equal or substantially equal length; depending on the type of alloy, type of profile and shape, generally desirable 2~8mm.
For aluminum profiles with complex cross-sectional shapes, large wall thickness differences, and large outlines, when designing die holes, the flow rate of the profiles should be adjusted using different working belt lengths.
There are many ways to calculate the length of the working belt of the aluminum profile die hole. According to the supplementary stress method, the following formula can be obtained:
hF2=hF1fF2·nF1/nF2·fF1 or hF/hF2=fF1/fF2=nF2/nF1
In the above formula hF1, fF2, and nF1 are the length (mm), area (mm²), and perimeter (mm) of the die hole working belt at section F2 of the aluminum profile;
When the aspect ratio of the aluminum profile is less than 30, or when the maximum width of the profile is less than 1/3 of the diameter of the extrusion cylinder, ideal results can be obtained by using the above formula.
When the width-thickness ratio is greater than 30 or the maximum width of the aluminum profile is greater than 1/3 of the diameter of the extrusion cylinder, in addition to the above factors, the distance between the profile section and the center of the extrusion cylinder needs to be considered when calculating the length of the working belt of the die hole; That is, the working belt in the core area of the die hole should be lengthened to increase the obstruction.
When using the above method to calculate the length of the working belt of the die hole forging each area of the aluminum profile, the length of the working belt on a section should be given as a reference value for the calculation (generally, the minimum working belt length of the profile wall thickness is given).
We can determine the minimum length of the working belt according to the specifications of the aluminum profile and the capacity of the extruder; the maximum length of the working belt is determined by the maximum effective contact length between the metal and the working belt of the die hole during extrusion. The length of the working belt is 3~15mm, and the maximum is not more than 25mm.
| Extruder Capacity (MN) | 125 | 50 | 35 | 16~20 | 6~12 |
| Minimum length of die hole working belt (mm) | 5~10 | 4~8 | 3~6 | 2.5~5 | 1.5~3 |
| Die hole empty knife size (mm) | 3 | 2.5 | 2 | 1.5~2 | 0.5~1.5 |
2. Supplementary blocking effect of blocking angle
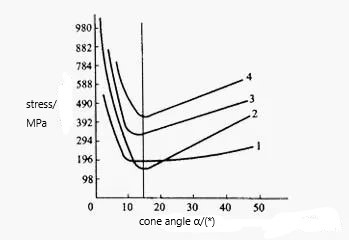
The entrance cone angle of the die hole is related to the size of the extrusion force, as shown in the figure below;
According to this rule, making an entrance cone angle of less than 15° at the flat die hole can hinder the flow of metal.
According to the supplementary stress method, the obstruction angle can be determined by the following formula:
in the formula
a—obstruction angle/degree
m—supplementary stress/MPa;
B—the friction coefficient between the metal and the working belt of the die hole;
gt—true deformation resistance/MPa when the metal particles flow through the working belt of the die hole at the extrusion temperature;
When extruding ordinary aluminum profiles with a flat die, the blocking angle is generally not greater than 15°, and 3°~10° is the most effective.
3. The flow-promoting angle (booster cone or feeding cone) is used to balance the flow rate of the profile
When extruding difficult-to-extrude aluminum profiles with very different wall thicknesses, to reduce the unevenness of the flow rate of the profiles, a so-called flow booster can be made on the thin-walled parts with large resistance and difficult-to-form that can help the profile flow. angle, the profile can flow to the thin-walled part;
4. Use balance holes or process allowances to balance the flow rate of profiles
When extruding an aluminum profile with a particularly complex shape, poor symmetry, or a large difference in wall thickness of each part, only one die hole can be arranged on the die surface, to balance the flow rate, ensure the accuracy of the size and shape of the profile, or reduce the Squeeze factor.
We can add one or more balance holes at the appropriate position of the die plane, add ribs or increase the wall thickness in the appropriate position of the aluminum profile in the form of process allowance, and use machine addiction or chemical milling after the profile is extruded. method to restore the finished shape and size of the profile.
5. The flow rate of the profile is balanced by the porous symmetrical arrangement of the die holes
This method is one of the most effective and reliable methods to solve the problem of the uneven flow rate of aluminum profiles with extremely complex shapes and poor symmetry.

